ACCESS > How to configure Okta for SAML and SSO
General
In order to integrate Okta SAML/SSO with your Tallyfy organization, you will need to:
- Set up and configure an Okta app with SAML support.
- Use the Okta app's settings to configure SAML on Tallyfy.
- Enable SAML for your organization on Tallyfy, to start SSO auth and user provisioning.
Create an Okta app for your Tallyfy organization
Preparing the new app
- First make sure that you are using the Admin Console. Then in the top left header choose Classic UI:

- In the menu, go to
Applications > Applicationspage, then clickAdd Application:

- Click Create New App:

- A modal will appear, select
Webas the Platform andSAML 2.0for the sign-on method, then clickCreate:

General settings
- Choose a name for your app, and upload your logo, then click next:

Configure SAML settings
First we will need to get the default SAML values from our organization in Tallyfy:
- Select our Organization's profile from the Support page. This part will be done by Tallyfy support - so email support (at) tallyfy (dot) com
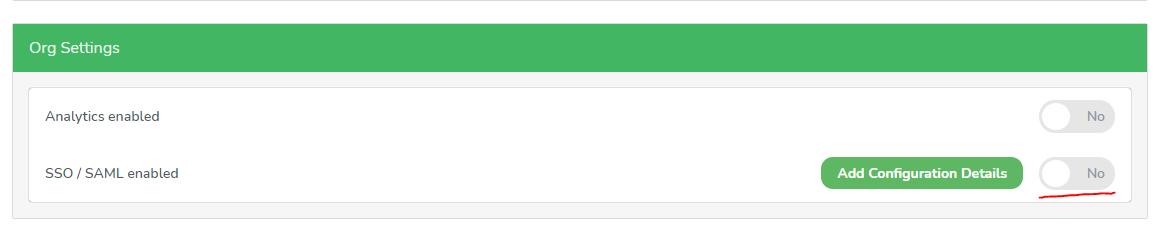
- Scroll to Org Settings tab:

- Click on Add Configuration Details: Ignore the empty fields for now and scroll down to the existing default values.

- Now, we will fill the SAML settings in Okta, using those values:
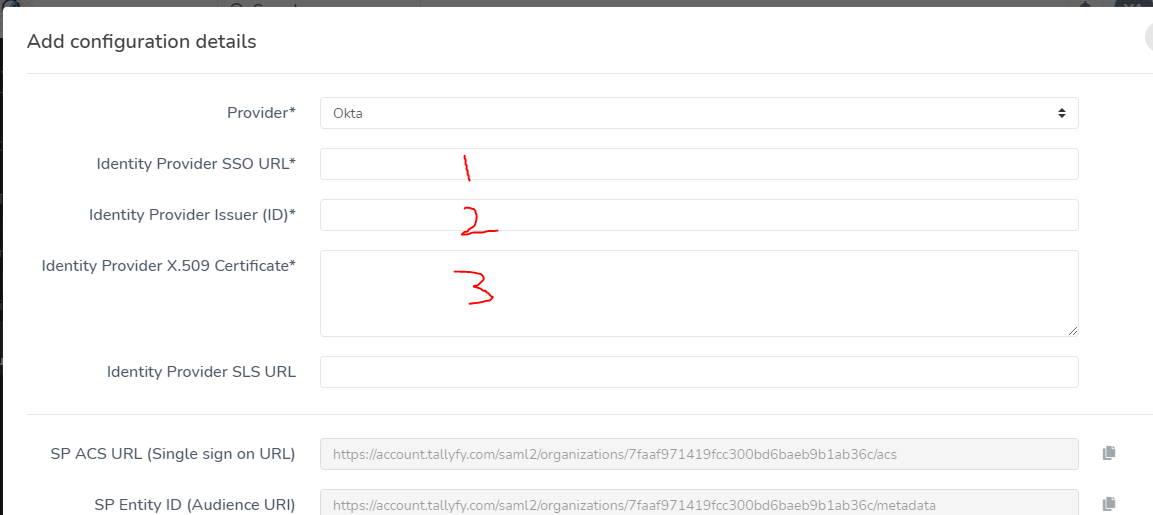
-
Single Sign On URL: In this field, copy the value from SP ACS URL (Single Sign On URL). (number 1 in the screenshot above)
-
Use this for Recipient URL and Destination URL: Leave this checkbox selected.
-
Audience URI (SP Entity ID): copy the value from SP Entity ID (Audience URI). (number 2 in the screenshot above)

- Now, click Show Advanced Settings, and change the value of Authentication context class to
X.509 Certificate:

- Attribute Statements: Add three attributes just like the screenshot below:

- Click
Next.
Configure Feedback:
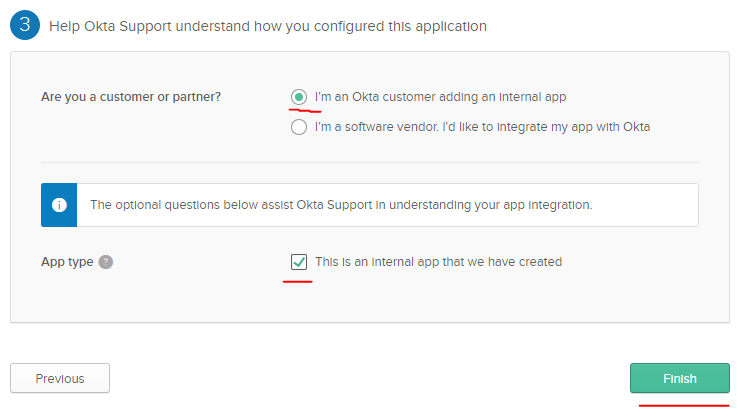
- Select
I'm an Okta customer adding an internal app. - Check
This is an internal app that we have created. - Click
Finish:
Configure SAML on Tallyfy:
-
Since you have an Okta app ready, First we will get the SAML data needed to configure SAML on Tallyfy.
-
Click on the Sign On tab in your Okta app page:

- Scroll down, and click View Set up instructions:

- Great, now it will lead you to the page containing the SAML configs of the identity provider:

- We will use the values in the above page as SAML configs to integrate this app to our Tallyfy organization.
- This step will be done by Tallyfy Support - so email us the values requested here. Go back to our Tallyfy Support page where the SAML configs modal is still open, then we fill the values respectively, as shown in the screenshot below:
- After successfully saving the configs, Tallyfy will need to enable SAML in this organization.
- Click on the toggle button next to Add Configuration Details:
Congratulations, now Single Sign-On and User Provisioning using Okta will be working for this organizations' users!
How to provision new members to Tallyfy using SSO
Go back to the Tallyfy Support page and open the SAML configs modal, copy the Tallyfy login URL and share it with your members who have access to the Okta SAML app. This will be provided by Tallyfy to you - the customer.

They can use this link to access Tallyfy, old users will just login, while new members will be added to your Tallyfy organization automatically.